Refurbished Mid-19th Century Sailmaker’s Shears

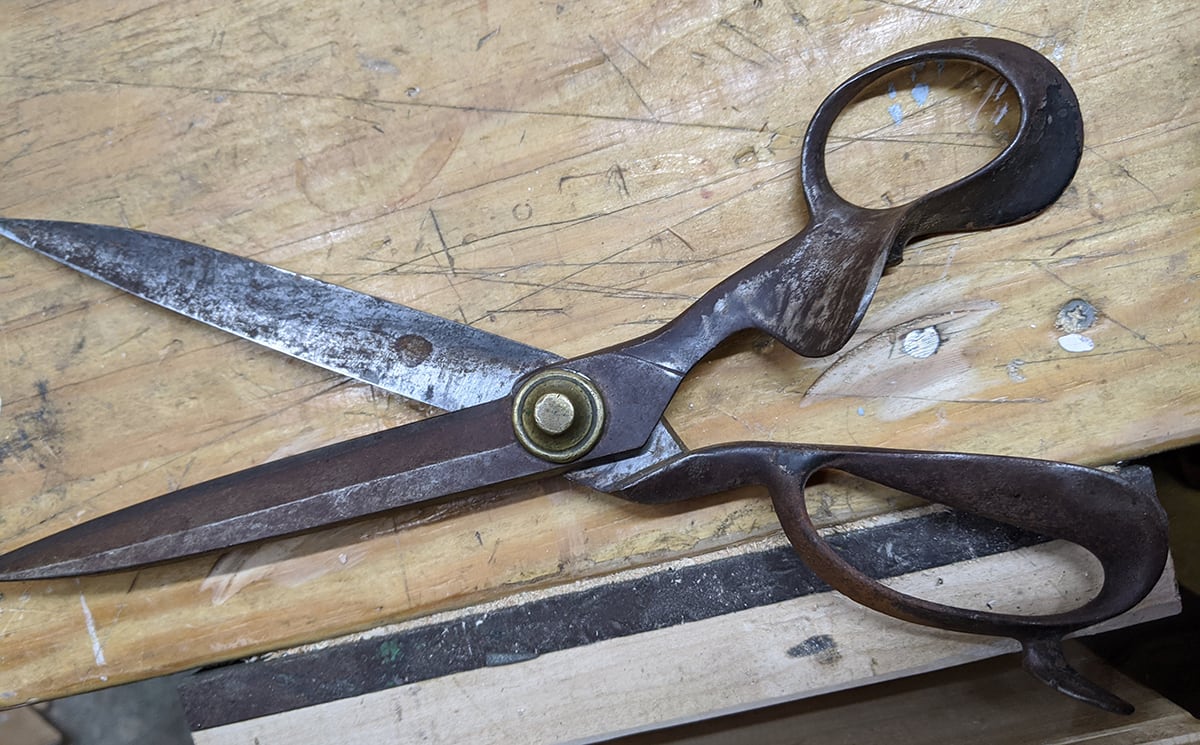
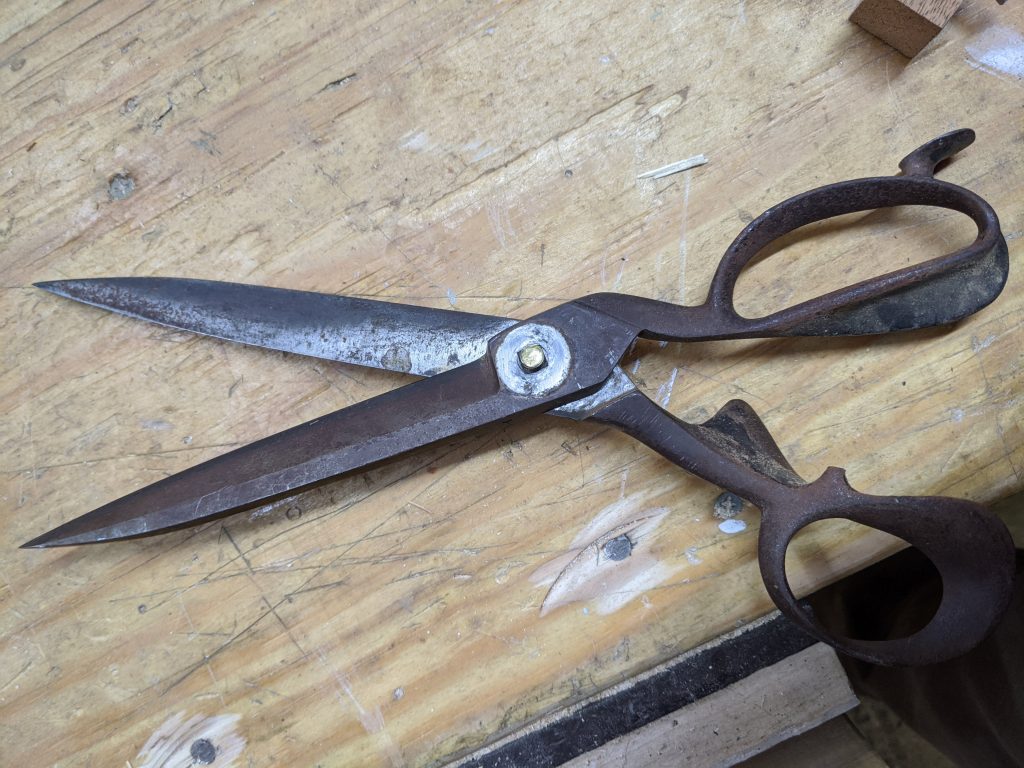
I picked up a rusty old pair of shears at my woodworking guild’s weekly meeting. They had some extra pressure points for the thumb and pinky, which I presumed might help with cutting difficult material. I cleaned them up and did some research on them – thought I would share the results.

Cleanup

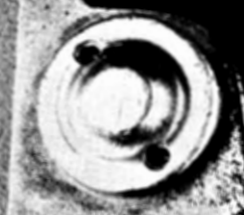
The first step was to disassemble the shears which were held together with a brass fastener that had two holes that you could grab to loosen or tighten.

Brass fastener

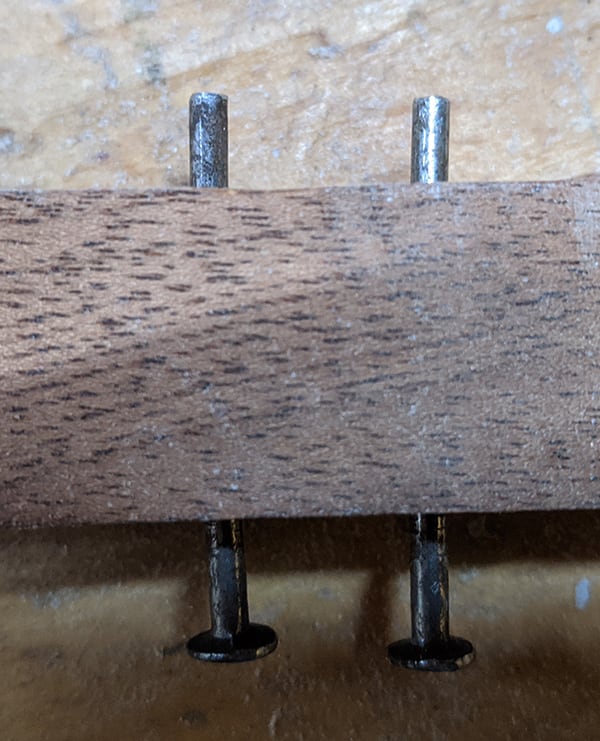
I hoped to get the shears disassembled, so I took a piece of scrap wood and put two nails in it and sawed their ends blunt. The result was a tool that lined up with the fastener.

Fabricated tool to disassemble scissors
Back of scissors with nut removed

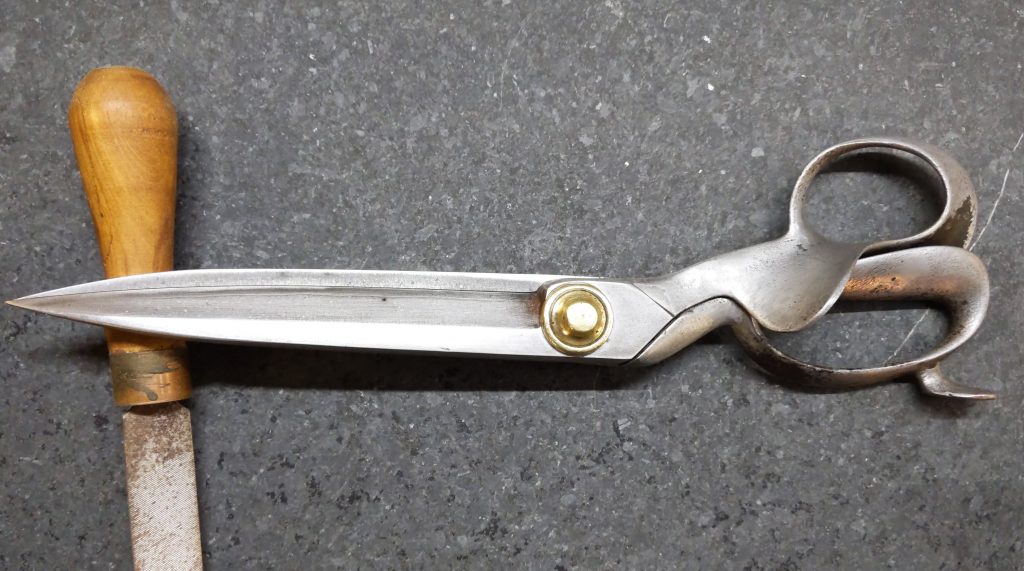
Once disassembled, I soaked the blades in vinegar for a day and then sanded and buffed them to a smooth finish. I sharpened the steel by lapping on sandpaper against a known flat surface. I also buffed the brass fasteners to make them nice and shiny. It appears that the upper section was originally painted black but I left it as-is, with a thin coat of oil to prevent rust.

Results

polished up and super sharp

History

The shears were old and the maker’s mark is on the brass fastener but it was worn off. I researched based on some clues and determined that they were made in New Jersey in the mid 1800s by Heinisch and Wiss who had innovated blade construction by laminating hardened steel to for the cutting edge with iron for the other parts of the scissors. More information here>


Nakashima Inspired Coffee Table

I recently used some of the wood that I milled back in the summer of 2018 to make a coffee table. The design of the table was inspired by a coffee table by George Nakashima.

Nakashima’s table is more beautiful – he was a true master! His was in walnut but mine is in maple.

I have a few thoughts on the process and product:

  • this project was hard, physical work but was actually rather simple in that 4 pieces of wood were being connected together to form a piece of furniture;
  • the hard work came from the width of the board. I don’t have power tools that can process a 20″ wide board, so I planed it by hand;
  • there were moments when I struggled with my preconception that I needed to have strict measurements to guide the build. It was deeply liberating to embrace the freedom of live-edge furniture making like this. I was able to make decisions and judgements based on how I feel about the scale, dimensions and shape;
  • I used no glue in the project. Joinery was entirely done with threaded brass inserts;
  • I finished the piece with 6 coats of boiled linseed oil;
  • The table’s primary utility, for now, is to host my 10 year old daughter’s lego building activities.

Here’s a close-up of the bridle joint:

Here, I finished some rough planing in the garage:

makin’ shavins

Here, a set of handplanes were used to make the surface smooth and flat:


New Year, New Bathroom

This fall, we demolished the old tub and shower door, replacing it with a new cast iron tub, shower curtain and subway tile. Then, in December, we removed the vanity, vinyl floor and fixtures. We replaced them with cabinets that I built, new tile floor and a quartz countertop.

The cabinet doors and face frames were build with maple that was harvested from our neighborhood 2 years ago.

The Layout

The first thing that we did was define the layout using Sketchup:

A small layout with a narrow vanity. The angled countertop allows the door to open into the room.

Before

There are a few problems with the old bathroom:

  • there are stains on the fixtures
  • the colors are awful and the walls have been discolored by condensation drips
  • there is mold and grub around the tub, especially along the shower door
  • the floor is vinyl and cracked
  • the tub is 28″ deep and really cramped
  • the closet shelves are made of oriented strand board and could be improved
  • the shower doors do not slide without serious effort
OMG.SO.UGLY.

During

It’s nice to paint before the floor goes in.

After


Affordable College Selection

Some tips for students and parents regarding the selection of an affordable college education.

Be Ambitious

Work hard, be yourself, get involved in your school, get good grades and go to the best school that you can get into and afford. College advisors recommend that you apply to three realistic schools plus one reach and one fallback.

Be Realistic

As an exercise, remove all emotions from the decision. When you are done with college, you will get your first real job. You will be responsible to pay all of your bills, including student loans. Here is an article by Pete the Planner showing spending percentages for a $40k salary. Here is an excel budget that I made using Pete the Planner’s percentages. Here is a student loan calculator student loans are typically 10 years and at the time of writing have 5% APR.

Enumerate Your Values

Know what you are looking for in a school. Here are some factors to consider: size of campus; size of student body; concentrations/majors available; internship opportunities; cost; flexibility of learning; opportunity to study abroad; city vs country; reputation; athletics; activities. If you want to move off-campus as an upperclassman, what are the local real estate options for students? Do you need to rent through the summer to have a school-season housing?

Location

Being close to home is really comforting to a lot of people. Others feel hampered by it. However you feel, keep in mind that there are extra costs associated with going to school at a location only accessible by air travel:

  1. 7 flights per year (9 if you plan to come home for Thanksgiving)
  2. Hotel and rental car if parents will do a dropoff
  3. Graduation flight for the whole family plus hotels and restaurants
  4. Luggage fees at the end of the year will be very high, unless you discard everything that doesn’t fit in your 50 pound bag. Typically, this will be all of your bedding, toiletries, hygienic products as well as any food or cooking tools that you have acquired

Other Tips

  • Debt payments are difficult to understand – especially when it is your first try at it. Currently, loan rates are at 4.53%, so that means that for each $10k that you borrow, the first $453 per year that you pay does not reduce the “principal” or the amount that you owe. This article shows the problem with student debt. The discussion started with this tweet:
  • Parents: the Fidelity Rewards Visa credit card will deposit 2% of spending into a Fidelity College Savings 529 account. This will really add up over time.
  • If you Google “<college name> common data set” you will get standardized information about your college. Each college provides the data on their website.
  • Consider whether you will get a Master’s degree. They only take 18 months. Assuming the reach school net cost of $30k per year and a state school net cost of $10k, look at this math:
    4 years at reach school = $120k total net cost
    4 years at state school plus 18 months at reach school = $85k total net cost
  • Most adults who went to college have some student loan debt, but high school students don’t have the life experience to understand what is a lot and what the implications are. How much student loan debt is too much? (72% of borrowers have less than $25K in student loans)
  • President Obama made it mandatory for colleges to offer a net price calculator on their website. It’s easy to find it if you google it – example
  • Interview some college graduates. Here’s some good questions:
    Where did you go to college?
    What was your college major?
    What do you do for work now?
    What do you value most about your college experience?


A Double-Batch of America’s Test Kitchen Classic Chocolate Chip Cookies in 6 steps

These are amazing cookies. For the most part, the process is similar to other cookies, but the browned butter caramel is special here. I’m not listing all steps because most of the steps are really mundane.

  1. Preheat oven to 375 degrees.
  2. Brown 2 ½ sticks of butter until nutty and golden brown (this takes a while. Don’t rush it.)
  3. Put 1pound, 1 ½ oz (by weight) of flour (or 3 ½ cups) in a large mixing bowl and mix in 1 teaspoon of baking soda.
  4. Make a caramel:
    -Put the melted butter in a bowl and add 1 stick of non-melted butter
    -Add 1 cup granulated sugar to the butter
    -Add 1 ½   cups of dark brown sugar; or if light brown sugar do the same but add a little molasses
    -Add 2 teaspoons of salt
    -Add 4 teaspoons of vanilla extract
    -Stir to combine for 30 seconds
    -Add 2 egg yolks plus 2 whole eggs
    -Mix in 2 additional sessions [for each session, stir for 30 seconds and rest for 2 minutes] until a caramel is formed.
  1. Stir in the flour and 2 cups of chocolate chips.
  2. Note: do not multi-task while baking the cookies – they will burn. They should take 10-14 minutes per batch. Only use the middle rack and don’t do two batches at a time because the bottom batch will burn on the bottom.

IMAGES: